| Your admin account | ||
| This section requires information to create your administration account. Use only alphanumeric characters. Enter the data carefully ! | Input an original admin username and password here. Make sure to either memorize it well, or note it down somewhere safe; you won't be able to administer your site if you lose this data. |
|
| Username | This will be the username for your everyday administration of coppermine - choose one that you can memorize and enter easily. This entry is case sensitive so give special consideration when creating a username. Pics that you upload later under this admin account will display the name shown in the uploader field. Comments you make will also display this name, as well, for others to see. |
|
| Password | This will be your admin password to your coppermine install. Don't use trivial, overly abused passwords - if an attacker figures out your password, s/he will be able to hack your entire site! Use a combination of upper and lower case letters and numbers like "j3e4N5n6yG". Remember, passwords like your admin username are case sensitive. Be careful when creating your password. Write it down and keep it safe, preferably somewhere away from your computer. |
|
| Email address | This email address will be used to send emails from the webserver (e.g. the registration email, notifications and ecards). Make sure that it is a valid email address. |
|
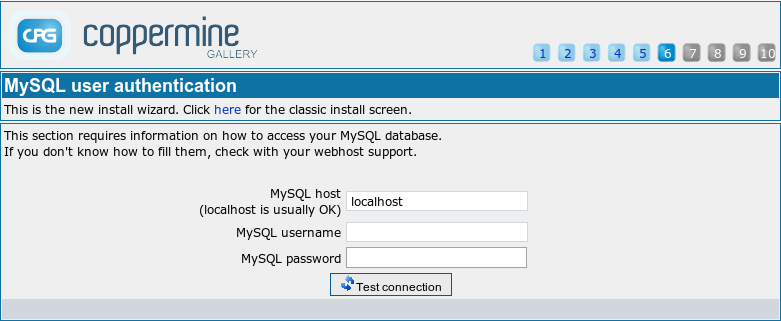
| Your MySQL configuration | MySQL is the type of database service that is available on most webservers. If you don't have it, you cannot install it. That is, unless the server is yours to administer. If you are webhosted, you are probably out of luck. It's mandatory to have a mySQL database to run Coppermine or any other PHP-based script. You can not fake the mySQL information during install, you must know it before hand, and enter the information as required. If you're not sure about the information required, ask your webhost. |
|
| This section requires information on how to access your MySQL database. If you don't know how to fill them, check with your webhost support. | ||
| MySQL Host (localhost is usually OK) |
||
| MySQL Database Name | Coppermine will not create this database for you - it must exist prior to any attempt at installing coppermine. (If you do not have a pre-designated database, you will have to create one, provided you have the authority on your site to do so). |
|
| MySQL Username | The mySQL user name does not have to be your coppermine admin username, nor is it the necessarily the same as your FTP username (although this can be the case for some users, but only by sheer coincidence or deliberate intention, to simplify site administration). The mySQL user needs the permissions CREATE TABLE, INSERT, ALTER, REPLACE, UPDATE, DELETE, SELECT. |
|
| MySQL Password | The password that goes with your mySQL username. |
|
| MySQL table prefix (the default value is OK; do not use dots!) |
Coppermine's tables can co-exist in an existing database which has tables used by other applications. All coppermine tables will be using a different prefix from these, as specified here. You can even have several coppermine installs using one database - only the table prefixes have to differ in each case. Unless you know what you are doing, don't change the default value. |
|
| ImageMagick | You can not fake an ImageMagick path, you have to know it. If you're not sure, leave this field empty - Coppermine will then try to use GD by default. You can edit the path later as well in the config screen. You can only install ImageMagick or GD if the server is yours to administer - if you're webhosted, you probably can't. The user of the webserver, who wishes to use ImageMagick, will need read/write/execute permissions in the folder where ImageMagick's convert executable resides in. |
|
| Coppermine can use the ImageMagick 'convert' program to create thumbnails. Quality of images produced by ImageMagick is superior to GD1 but equivalent to GD2. If ImageMagick is installed on your system and you want to use it, you need to input the full path to the 'convert' program below. On Windows the path should look like 'c:/ImageMagick/' (use / not \ in the path) and should not contain any space, on Unix is it something like '/usr/bin/X11/'. |
||
| ImageMagick path | ||
| After having entered all required data, click this button to submit the form | ||
 On the initial screen of the wizard you will see the license disclaimer that coppermine comes with. If you don't accept the license, you're not allowed to continue the install wizard. You can re-read the license at any later time (after having completed the installer) by going to this documentation and navigating to "Coppermine documentation" → "License & Copyright".
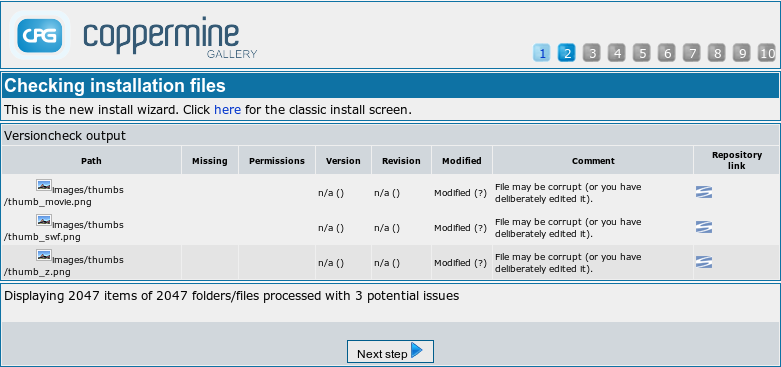 In the second stage of the installer a check is performed if the package you are about to install is actually the most recent one. This is meant to make sure that you are actually installing the most recent version of Coppermine, where all known bugs and issues have been fixed. Usually, if you have just downloaded Coppermine from the official Coppermine download at sourceforge.net you should be good. If the installer complains that you don't have the most recent version you should get the most recent version first before continuing. The only exception to this rule is if you are not using an official package (downloaded from the official Coppermine download section), but a subversion checkout: the version/revision counter is not being kept up to date between releases, so if you use a subversion checkout, it's expected behaviour that some files are being displayed as outdated. If you have no idea what a subversion repository is, this exception obviously doesn't apply for you.
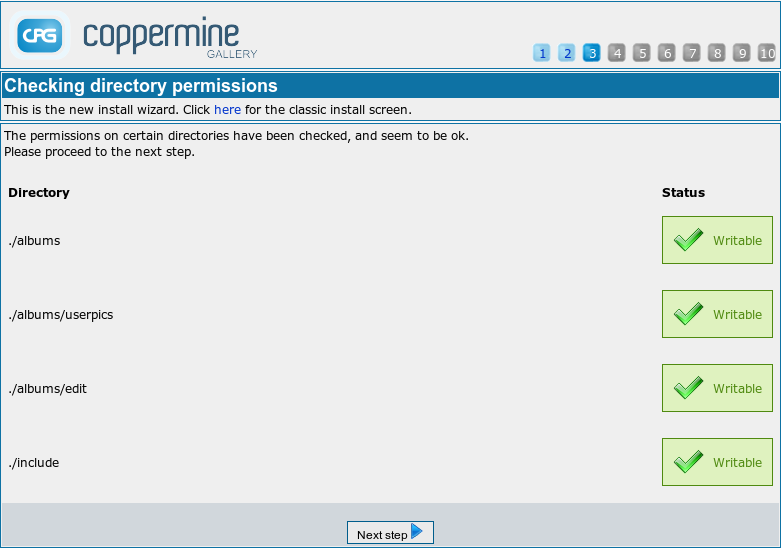 Coppermine needs write permissions in some sub-folders as suggested in Setting permissions. The installer can't set those permissions for you, so you need to set them in advance. If you have done so successfully, all folders that the install wizard checks in this stage should be marked as "OK". If this is not the case for you (i.e. if the install wizard complains about missing permissions in one or more folders), just leave the browser window as it is and set permissions properly. After having done so, return to the install screen that you have left open in your browser and refresh the page (by using the corresponding refresh button in your browser) to see if the permission issue has been solved.
You can only click the next button if the needed permissions are set.
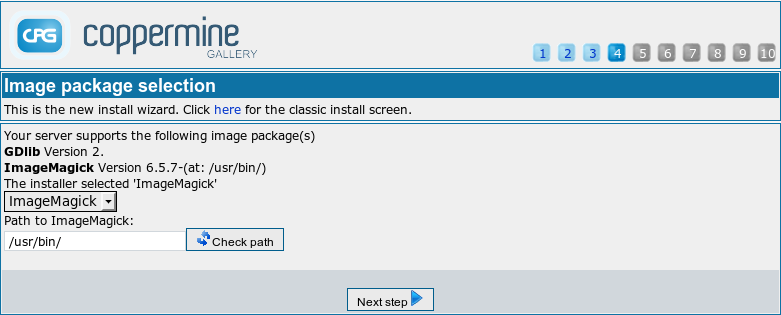 Coppermine needs an image library to be present on the server (see minimum requirements → image library). Currently, GD and ImageMagick are supported. In this stage of the install wizard, various checks are being performed to determine what image library you have available on your server. Usually, you can just continue to the next step if at least one library is found. If the installer complains that it couldn't find an image library, you will have to manually specify it. You can't make this up, nor will coppermine install an image library for you - it's part of the minimum requirements to have one. If you don't have one of the supported image libraries, you won't be able to use coppermine.
 In this stage, the image library you have selected in the previous step is being tested, i.e. the installer attempts to perform some operations like resizing or image creation that the coppermine script will perform as well once you have set it up. Usually, the test runs fine and you should see the generated images inside the left column. If that's the case for you, you can savely continue. If that is not the case, you might have to go one step back and choose another image library. Another possible reason for the test going wrong are missing permissions.

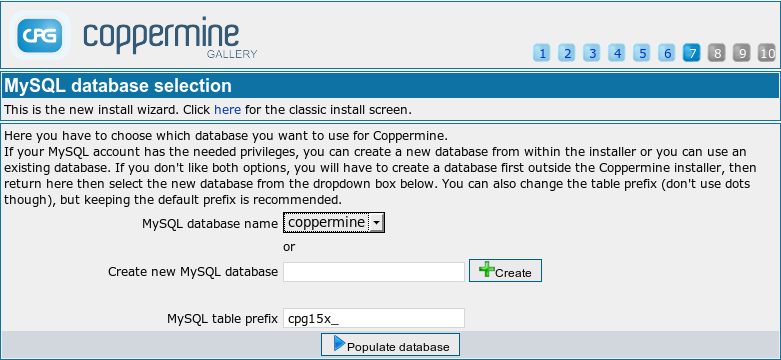 Here you have to choose which database you want to use for Coppermine.
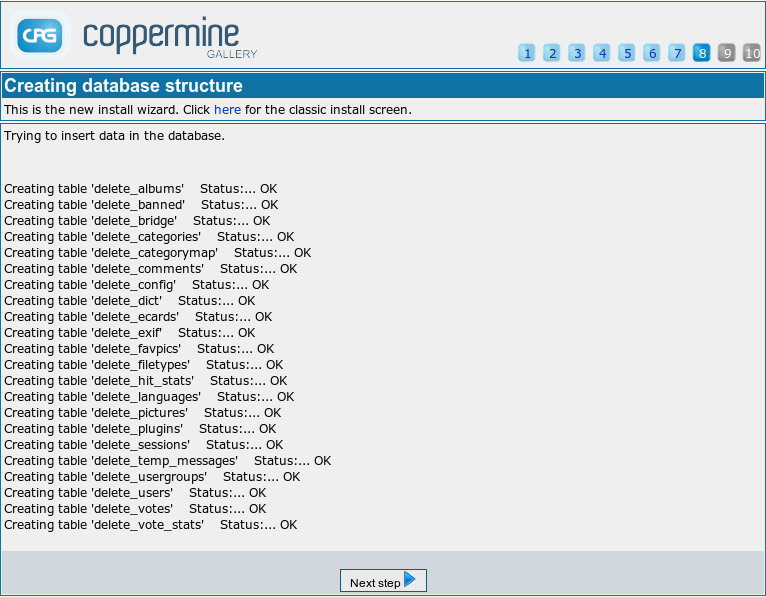 The database structure screen is for information only - there is nothing you can do to interact here. The screen shows the progress of the database operations performed to create the database tables for your gallery. If everything works as expected, you should see a couple of rows with a message like Creating table 'XXX' Status:... OK. If you don't get the status "OK" in each line, something went wrong and needs looking into. This is usually the case if the mysql user account you specified in the step "MySQL user authentication" doesn't have the needed privileges to create the tables. Another reason for failure can be lack of space in the database. In both cases you should contact your webhost for support.
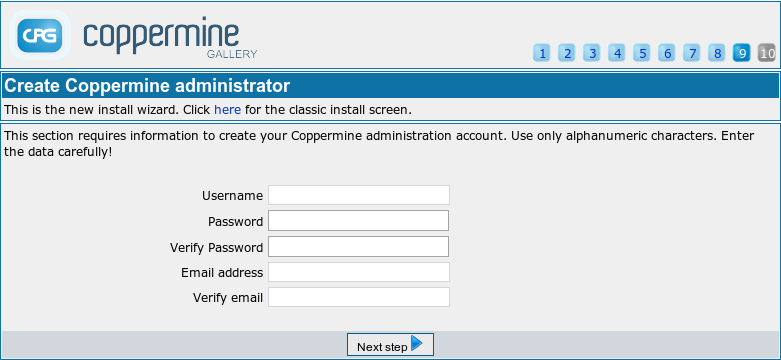 In this step you need to create a user account with admin privileges for you. It's very important to enter the data carefully. Some facts to remember: